
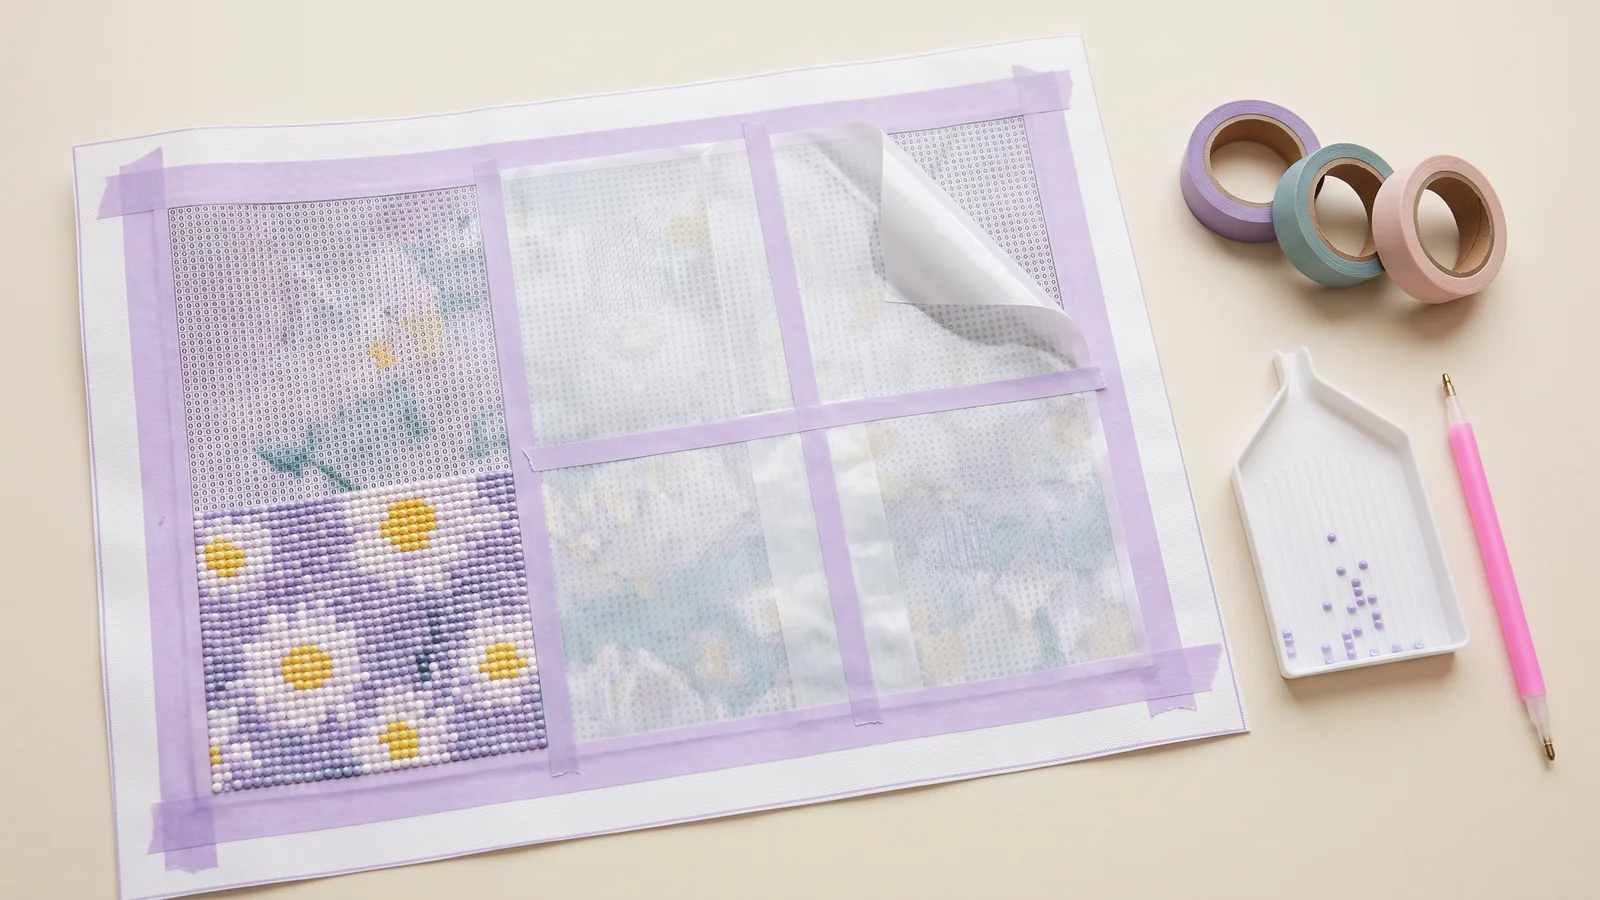
Quick answer: To use diamond painting tape, apply low-tack washi tape to the sticky margin outside the printed design. To mark work sections, put tape on top of the protective film, not directly on the uncovered symbols. Keep unused areas covered, test the tape first, and peel it off slowly when you finish.
If your wrist keeps catching on a sticky canvas edge, a little tape can make your next painting session less frustrating. It can also help you see where one work section ends and the next begins.
The trick is knowing which surface to tape. This guide covers washi tape for borders and sectioning, plus the difference between washi tape and double-sided adhesive used for repairs.
Jump to: Canvas edges · Sectioning · Removal · Troubleshooting · FAQs
What is diamond painting tape used for?
Washi tape is a lightweight paper craft tape, typically designed to be easy to reposition. Diamond painters use it to cover excess adhesive around a canvas, mark working sections, and label drill containers. However, not every roll has the same adhesive strength, so easy removal should never be taken for granted.
Think of your project as three separate surfaces:
| Surface | Where the tape belongs | What to avoid |
|---|---|---|
| Sticky margin outside the picture | Low-tack tape over the excess border glue, after testing | Covering the outermost drill positions or the color key |
| Protective film over the picture | Guide strips on the upward-facing side of the film | Confusing the cover with the adhesive underneath |
| Uncovered symbol grid | No washi tape here; this adhesive needs to hold drills | Taping across symbols or completed diamonds |
Remember: border tape touches the spare margin; sectioning tape touches the cover.
Choose your tape and gather a few supplies
Start with a smooth, low-tack washi tape that is wide enough to cover your canvas’s sticky border without hiding the design. A roll around 15 mm wide is a practical starting point, not a requirement. Narrower tape can make less bulky section markers on the film.
You will also need:
- Your canvas with its original protective cover still in place.
- Scissors for cutting tape away from the canvas.
- A ruler, if you want evenly sized sections.
- Optional diamond-painting release paper for covering unfinished areas.
Low-tack does not mean risk-free. Test a small piece on an inconspicuous margin before taping all four sides. Check for lifted printing, disturbed adhesive, paper fibers, or residue. A quick test cannot guarantee the same result after weeks, so also check any removal guidance on the tape packaging.
Starting a new project? Our new diamond painting kit checklist covers the checks to make before placing your first drill.
How to use diamond painting tape on canvas edges
1. Find the actual edge of the picture
Lay your canvas flat on a clean surface. Identify the outermost row of symbols and look for glue extending beyond it. That excess sticky margin—not the symbol row—is what you want to cover.
If there is no exposed border glue, you can skip border taping.
2. Expose only the margin you need
Leave the main design covered. Lift the protective film just enough to reach one sticky border at a time. Avoid resting your fingers or sleeves on the uncovered adhesive.
3. Align the tape outside the last row of symbols
Cut or tear a manageable strip away from the canvas. Position its inner edge just outside the printed drill area, then lower it onto the spare margin.
Look closely at the first and last symbols along that edge. Both should remain completely visible, with enough space for their drills. Keep the color legend and any useful labels readable, too.
4. Smooth lightly and finish the corners
Press the tape down gently rather than rubbing it hard into the canvas. At each corner, overlap the strips only enough to close the gap. Repeat on the remaining sticky edges.
Do a final check: no symbols hidden, no loose tape sticking into the work area, and no uncovered border glue catching your hand.
How to section a diamond painting with washi tape
For sectioning, apply the tape to the top of the protective film. The tape provides visible boundaries; the film underneath protects the adhesive. Working through the cover in sections is also recommended in Diamond Painting Shoppe’s beginner instructions. 9
- Mark the top of the cover. Add a small tape tab to the outward-facing side before lifting anything. This helps you put the original cover back the same way round.
- Choose a manageable section. Try a square around 5 × 5 cm or 10 × 10 cm—roughly 2 × 2 or 4 × 4 inches. These are suggested starting sizes, not rules. Use smaller sections when there are lots of color changes.
- Add guide strips to the film. Mark just the next row of sections if you do not want to grid the whole canvas. You can adjust the size as you learn your pace.
- Open a section from an outer edge. Fold the cover back where practical. If you need to trim it, lift the film clear of the canvas first and use scissors with both blades away from the canvas. Never cut an interior square by pressing a blade through the cover onto the canvas.
- Place the drills in the exposed section. Leave neighboring areas covered instead of peeling everything back to make room.
- Re-cover unfinished work. If you stop before completing the section, replace the original film with the same side against the adhesive, or use compatible diamond-painting release paper.
No-cut alternative: Use pre-cut release-paper squares intended for diamond painting. Replace a small area of the original cover at a time, overlapping the squares slightly so no adhesive is left exposed. Lift one square when you are ready to work. Release paper has a non-stick surface designed to protect the canvas adhesive.
Do not substitute ordinary printer paper, tissues, or wax paper. Choose purpose-made release paper and follow its instructions about which side contacts the canvas.
How to remove diamond painting tape
For tape attached to the canvas border:
- Hold the canvas flat near the strip you are removing.
- Lift a corner and peel slowly, folding the tape back over itself rather than pulling straight upward.
- Pause if the canvas, printed surface, or adhesive begins to lift. Do not tug harder.
A slow, low-angle peel is the approach described in Heartful Diamonds’ washi-tape guide. Your own canvas and tape still need a gentle touch. 6
Tape on a removable film section can usually stay attached to that section. You do not need to strip it off over the exposed canvas.
If tape leaves residue, avoid experimenting with alcohol, acetone, oils, or household adhesive removers on the picture. Ask the kit maker for a compatible cleanup method, especially if the residue reaches the drill area.
Common tape problems and what to do
| Problem | First thing to try |
|---|---|
| Tape covers the first row of symbols | Stop and gently reposition it outside the drill area. Do not place diamonds on the tape. |
| Sectioning tape curls off the film | Try a fresh strip on the clean, dry top of the cover, or switch to release-paper sections. Do not solve it by taping the exposed picture. |
| The outermost drills press against the tape | Check whether the tape overlaps their positions. Move it outward before continuing. |
| Tape pulls at the canvas or glue | Stop peeling and ask the kit maker for advice. Avoid force or unapproved solvents. |
| You cannot finish an opened section | Re-cover it with the original film or suitable release paper before putting the project away. |
The goal is a cleaner workspace, not a perfectly measured grid. If sectioning tape adds more work than it saves, keep it for the borders and fold back the original cover instead.
What if you mean double-sided diamond painting tape?
Double-sided adhesive is a different product from washi tape. Some diamond-painting canvases use a double-sided adhesive sheet to hold drills; others use poured glue. Border tape does not replace either adhesive.
If you bought tape specifically for repairing a non-sticky patch:
- Check that it is intended for diamond-painting canvas and compatible with your kit’s adhesive.
- Follow its instructions for preparing the area, positioning the adhesive, and removing the release liner. Keep the printed symbols visible.
- Avoid foam mounting tape and thick household double-sided tape, which can raise the repaired area above neighboring drills.
- If a new canvas has a large faulty area, contact the seller before attempting a repair.
Do not cover a damaged canvas with washi tape and try to place diamonds on top. For other project issues, see our diamond painting problems and solutions guide.
Frequently asked questions
Do you need washi tape for diamond painting?
No. It is an optional accessory. You can work successfully by keeping unused areas under the original cover or suitable release paper. Tape is most useful when excess border glue catches your hand or when clear section boundaries help you stay organized.
Can you use painter’s tape or masking tape instead?
A delicate-surface, low-tack painter’s tape may be an alternative for the spare border, but test it first and follow its surface and removal-time guidance. Ordinary masking tape varies in strength. Avoid duct tape and packing tape on the canvas, and do not assume any tape is safe simply because it peels easily from a desk.
Is washi tape the same as release paper?
No. Washi tape has adhesive and is used for borders, labels, or guides on the cover. Release paper has a non-stick surface and covers the sticky picture itself. They serve different jobs and can be used together.
Does this method work with round and square drills?
Yes. The placement rule is the same: keep border tape outside the drill positions and sectioning tape on the protective cover. See our guide to round and square diamond-painting drills if you are still getting familiar with the different kit types.
Can you leave washi tape on a finished diamond painting?
You can choose to keep it as a decorative border, but removable craft tape should not be treated as permanent framing material. For a temporary working border, remove it gently when the project is complete, following the tape maker’s guidance. Tape does not seal or secure the finished diamonds.
The simple rule to remember
Tape the spare border, mark the protective cover, and leave the symbol grid for diamonds. Start with one tested strip and a small work section. You do not need a complicated setup—just enough protection to keep your canvas clean while you enjoy the next few rows.