
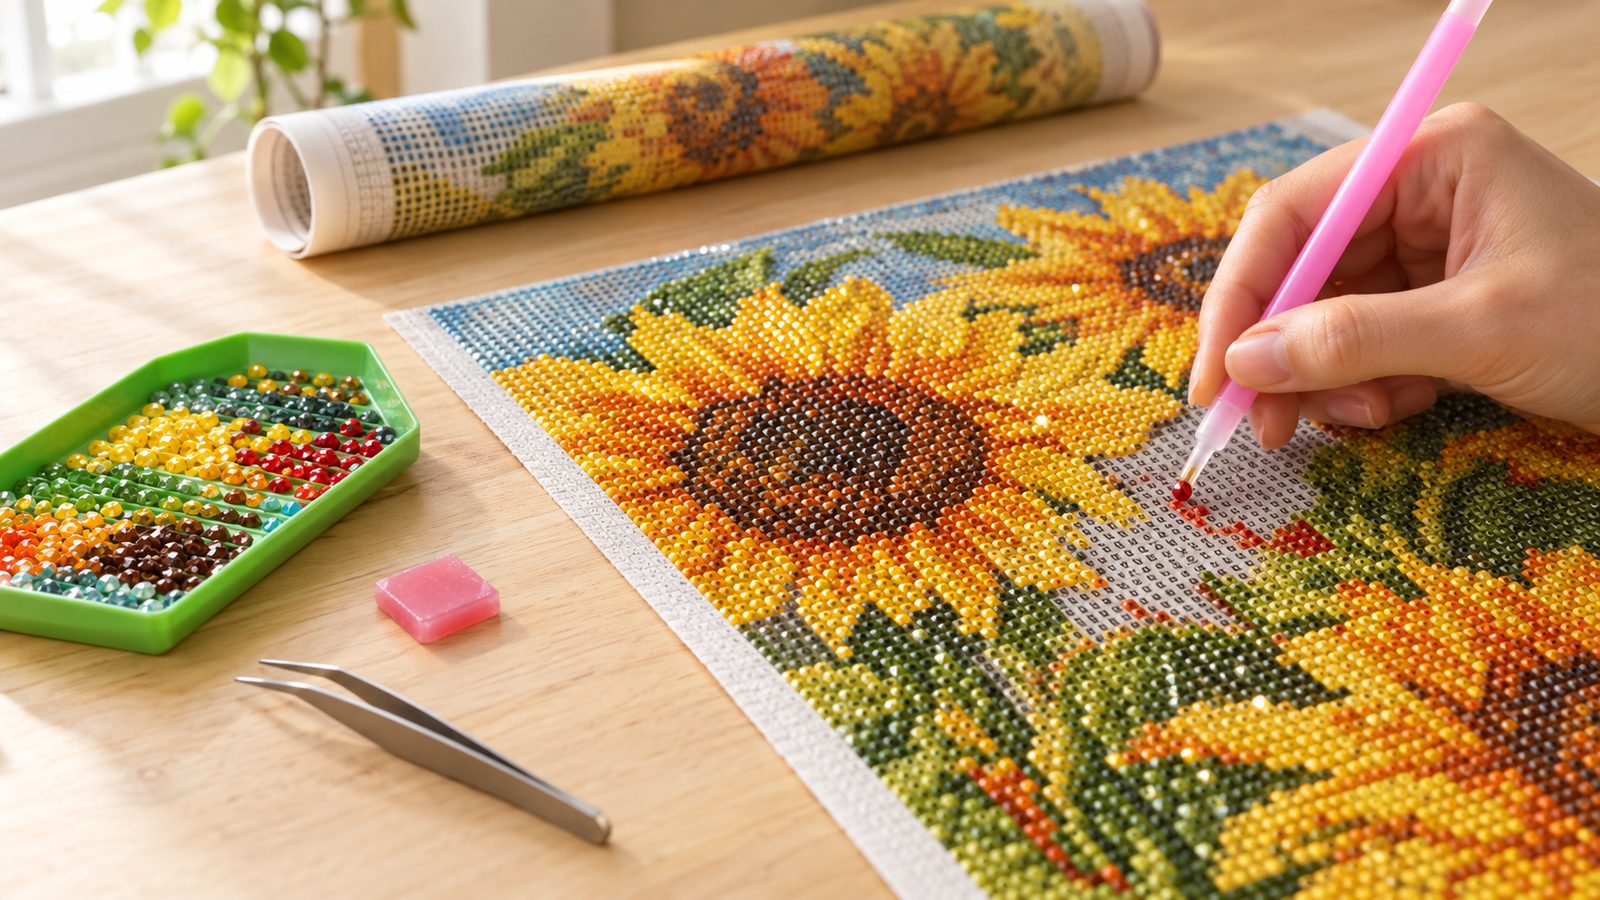
What is diamond painting? Diamond painting is a craft in which you press thousands of tiny, faceted resin tiles — called drills — onto a pre-printed, self-adhesive canvas. The canvas is covered in a grid of symbols, and each symbol maps to one colour of drill. Follow the symbols and a glossy, gem-like picture appears one piece at a time. It requires no drawing or painting skill.
Most people meet diamond painting by accident. They notice a finished canvas glittering on someone’s wall, assume it took an artist weeks, and are startled to discover it came out of an inexpensive kit and a plastic pen. That surprise is the whole appeal: the process is almost meditative, and the result looks far more impressive than the effort involved.
It is also a genuinely young hobby. Unlike cross-stitch, which has centuries of history, modern diamond painting grew out of bead-and-fabric mosaic traditions in Asia and became a mass-market craft only in the 2010s, once manufacturers in China worked out how to print self-adhesive canvases at scale. If you feel like the last person to hear about it, you are in good company.
Here is how it works, what you actually get in a kit, and the honest answers to the questions beginners ask most.
- How diamond painting works, step by step
- What comes in a kit
- Is it hard? Do you need to be artistic?
- Diamond painting vs. cross-stitch vs. paint by numbers
- Why it feels so relaxing
- How long a project takes
- How to start
- Frequently asked questions
How Diamond Painting Works, Step by Step
Strip away the packaging and the process is remarkably simple. A diamond painting kit is a printed canvas whose design has been translated into a grid of symbols, plus a bag of coloured tiles for each symbol. Your job is to match them up.

- Flatten the canvas. If yours arrived rolled, lay it print-side up under a few heavy books for an hour or two. A flat canvas is much easier to work on than one that keeps curling.
- Find the legend. Most canvases print the colour key along one edge: a symbol, its number, and a small printed swatch. Some kits also include a separate paper key. Keep it visible while you work.
- Peel back a small section of the protective film. This is the single most important habit to build. The film covers the sticky surface; peeling the whole thing at once exposes the entire canvas to dust, pet hair and mistakes. Work in patches the size of your palm.
- Pour one colour into the tray and give it a gentle shake. The tray’s ridged base lines the drills up so you can pick them up quickly instead of hunting through a pile.
- Load the pen. Press the hollow metal tip into the wax pad, then touch it to a drill — the wax picks it up and holds it.
- Place the drill on its matching symbol and press lightly. It sinks into the adhesive and stays.
- Repeat, section by section, re-covering any exposed adhesive with the film you peeled back if you are stopping for the day.
That is genuinely the whole technique. Everything else — round versus square drills, how many tips your pen has, which brand of wax you prefer — is refinement rather than requirement. If any of the vocabulary feels unfamiliar, our diamond painting glossary covers the terms in plain English.
What Comes in a Diamond Painting Kit?
A complete kit is self-contained. You can open the box and finish a picture without buying anything else, which is a large part of why the hobby is so easy to try.

Kits come in a few broad flavours — full-drill and partial-drill canvases, round and square drills, printed and blank canvases, and custom photo kits made from your own image. We compare them in the different types of diamond painting kits. Whatever the type, the contents are similar.
Almost every kit includes:
- A pre-printed canvas with a self-adhesive surface, covered by a clear protective film
- Drills in individual labelled bags, one per colour
- A printed colour legend mapping each symbol to a drill number
- At least one applicator pen with a hollow tip
- A small pad of wax or glue (the tacky stuff that lets the pen pick up a drill)
- A grooved sorting tray
- Usually tweezers, for lifting a drill that lands in the wrong square
What is usually not included: a light pad, spare wax, a storage case for leftover drills, and a roller. None of these are needed to finish your first canvas — but if you already know you are hooked, our guide to the tools every diamond painter should have covers which upgrades actually earn their place.
Is Diamond Painting Hard? Do You Need to Be Artistic?
No, and no. Diamond painting is mechanical rather than expressive: you are not deciding what to draw, or choosing colours, or judging proportions. The design is already made. You are placing the right tile in the right square, several thousand times.
This matters more than it sounds. In a 2016 study published in Art Therapy, researchers at Drexel University measured participants’ cortisol — the body’s main stress hormone — before and after a 45-minute art-making session, and found that levels fell in about 75% of them (Kaimal, Ray & Muniz, 2016, doi:10.1080/07421656.2016.1166832). Crucially, the effect showed no relationship to how much art experience they had. The calming part came from the act, not from talent.
The real demands are patience and tidiness, not skill. You need to work through the canvas methodically and keep track of which colour you are placing. If you enjoy the calm of jigsaw puzzles or colouring books, you already have exactly the temperament this hobby rewards.
Diamond Painting vs. Cross-Stitch vs. Paint by Numbers
These three crafts get grouped together because they all turn a printed pattern into a finished picture. The experience of making them is quite different.
| Diamond painting | Cross-stitch | Paint by numbers | |
|---|---|---|---|
| What you place | Faceted resin tiles ("drills") | Embroidery thread | Acrylic paint |
| Tool | Applicator pen and wax | Needle | Brush |
| Learning curve | Essentially none | Simple, but slower to pick up | Some brush control helps |
| Finished look | Glossy, dimensional, sparkles in light | Flat textile texture | Flat, matte |
| Typical project time | A few evenings to a few weeks | Weeks to months | A few evenings to a few weeks |
| Fixing a mistake | Lift the drill with tweezers and re-place it | Unpick the stitches | Paint over it once dry |
If you want something to do with your hands while watching television, and you like the idea of a picture that catches the light, diamond painting is the least demanding of the three to learn.
Why Does Diamond Painting Feel So Relaxing?
Ask a room of diamond painters why they do it and the answer is rarely about the finished picture. It is about the hour spent making it.
The most commonly reported effect is a kind of absorbed, unhurried focus — the state a psychologist would call flow. Diamond painting is unusually good at producing it, for three structural reasons: the task is repetitive enough to become automatic, each placement gives immediate visible progress, and there are no open decisions to make. It is hard to ruminate about tomorrow’s problems while you are counting squares to the next colour change.
The evidence base is encouraging but worth stating honestly. The Drexel study was a single 45-minute session with 39 adults; it measured a short-term change, and roughly a quarter of participants actually showed higher cortisol afterwards. That is a real limitation, and it means the sensible claim is “many people find this relaxing, and there is some early evidence that art-making lowers short-term stress markers” — not “diamond painting treats anxiety.”
We have written about the appeal of the hobby in diamond painting as a solution for stress and anxiety, and about the wider science behind diamond painting and how it may support your health, if that is the part you are curious about.
How Long Does a Diamond Painting Take?
Size is the main variable, and the range is wide. The estimates below are rough paces for a single-tip pen; a multi-tip pen that picks up several drills at once can cut the time substantially, and everyone slows down on detailed areas with many colour changes.
| Canvas size | Good for | Roughly how long |
|---|---|---|
| Small (around 20 × 17 cm) | A first kit, or a gift | A few evenings |
| Medium (around 30 × 40 cm) | Most beginners’ second project | Several evenings to a week |
| Large (around 60 × 45 cm) | Detailed images, faces and animals | 30 hours or more, often across weeks |
| Multi-panel sets | A wall feature | One panel at a time — treat each as its own project |
Smaller canvases are not just cheaper and faster — they are simpler. A small canvas holds less detail, so faces and fine scenery can end up soft. If your chosen image has a face in it, size up. Our complete diamond painting size guide goes through this in detail, including how to convert drill counts into a finished measurement.

Is Diamond Painting Suitable for Children and Older Adults?
Children: yes, with sensible supervision. The drills are small enough to be a choking hazard, so kits are not suitable for toddlers and should be kept away from children under three. From roughly six to eight years old, larger-drill kits are manageable and genuinely absorbing. The main adult job is keeping the drills out of reach of younger siblings and pets.
Older adults: diamond painting is one of the more forgiving crafts if eyesight or fine hand control is a consideration, because the tiles are moved with a pen rather than held between finger and thumb. Two small aids help a great deal: a light pad, which turns the printed symbols from faint grey into crisp black, and a magnifier on a stand. We cover both in our guide to making diamonds easier to see.
Four Things People Get Wrong About Diamond Painting
“It’s basically a kids’ craft.”
The beginner kits are child-friendly, but the hobby skews heavily adult. The largest canvases are genuinely demanding multi-week projects, and the most common reason adults give for starting is stress relief rather than the picture.
“The drills are actual diamonds, or glass.”
They are resin or acrylic plastic, cut with facets so they catch light like a gemstone. That is good news: it keeps kits inexpensive, and it means the tiles are light enough to stay put on the adhesive.
“A misplaced drill is permanent.”
It is not. Tweezers lift a drill cleanly, and the adhesive underneath still holds. The same applies to a drill that arrives slightly crooked. Nothing about this craft is unforgiving.
“It’s the same thing as paint by numbers.”
Both start from a printed pattern, but one ends in flat matte paint and the other in a dimensional, light-catching surface you place by hand. The process feels different too — paint by numbers needs a steady brush; diamond painting needs a steady rhythm.
How to Start Diamond Painting Without Wasting Money
The cheapest possible start is also the best one:
- Buy one small kit in a design you actually like. A picture you want on the wall is the best motivation to finish it.
- Read a buying checklist before you spend. Cheap kits vary enormously in glue quality and colour accuracy; what to look for when purchasing a diamond painting kit covers the things worth checking.
- Choose round drills for your first project. Round tiles are more forgiving than square ones — small gaps between them read as texture rather than as mistakes. Square drills produce a tighter, mosaic-like finish, but reward precision. We explain the difference in round, square, full and partial drills.
- Pick a simple image with fewer colours. A landscape or large bloom is easier to work through than a portrait with hundreds of shades.
- Check the kit includes a tray and wax. Some budget kits leave them out, and they are not optional.
- Do not buy accessories yet. Finish one canvas first. A light pad and a storage case are much easier to choose once you know how you like to work.
When your kit arrives, there is a short checklist worth running through before you place a single drill — we have it in what to do when your diamond painting kit comes. And when you are finished, resist the urge to leave it unframed and unprotected: how to display a finished diamond painting and how to seal and preserve one both cover that stage.
Still deciding where to buy? We keep a running list in where to get diamond painting kits.
Frequently Asked Questions
Is diamond painting a real hobby, or a gimmick?
It is a real hobby with a large, active worldwide community, annual design releases, dedicated tools and independent review blogs. It is a young craft rather than an old one, which is sometimes why established crafters have not encountered it yet.
Do I need to seal a finished diamond painting?
Not strictly, and many people hang theirs unsealed. But sealing protects the surface from dust and from drills lifting over time. If you plan to display or gift it, sealing is worth the extra step — our guide to preserving a diamond painting walks through the options.
What is the difference between 3D and 5D diamond painting?
The numbers refer to how many facets each drill has, which affects how much the finished picture sparkles. 3D drills have three facets per side; 5D drills have five. It is a description of the tile, not of the quality of the kit. We break it down in 3D versus 5D diamond painting.
Why do my drills keep falling off?
Usually one of three things: dust or pet hair on the adhesive, a canvas that has been left uncovered for a long time, or a kit with a weak glue layer. Lifting drills are fixable — drills getting stuck together or lifting off the canvas covers the causes one by one, and diamond painting problems and solutions handles the rest.
How many colours are in a typical kit?
Most kits use somewhere between 20 and 60 colours, and detailed or custom photo kits can exceed 100. Drill colours are usually referenced using DMC embroidery floss codes, which makes it possible to match or reorder a specific colour even across brands.
Can you clean a finished diamond painting?
Gently. Dust it with a soft dry brush. If something spills, blot — never rub — with a barely damp cloth and let it air-dry face up. Once the canvas has been sealed, a barely damp wipe is fine, but never soak it.
Diamond painting is not complicated, and that is precisely the point. The technique takes about a minute to learn; the pleasure is in the repetition, the small steady progress, and the moment the sparkle starts to show through. Start with one small kit, work in sections, and keep your leftover drills tidy — here is how to store them.
If you are brand new to the hobby, the diamond painting craze and how to get started is the natural next read, and the guides in our Beginner Info section are written for exactly where you are now. Welcome to it.